Sunday, December 29, 2013

Recycled T-Shirt Logos

These are recycled logos in their finest moment! A once stained t-shirt that was worn for many months has taken on a new life and the fabulous, glow-in-the-dark 'Henry + the Invisibles' logo will live again as a brand new tote bag. A once torn up, discarded hoodie is now the center of attention as a useful bucket to hold anything your heart desires.
All items are recycled with love and are sure to live a beautiful second life!

Here was my process for attaching the logo onto the canvas:
I carefully cut out the logo from the old t-shirt and ironed a Pellon Clear Fuse on the back. This way the logo would fuse to the fabric and not shift when placed on the front of the canvas. A zig zag stitch around the perimeter of the logo secures it in place.

For the sweatshirt, I used the same process as above, but I didn't waste the rest of the sweater material after I cut out the logo. It became the lining for the basket.

I'm know I'm not the only one with a favorite t-shirt that doesn't get any more use because of a tear or stain...but if you still love the image, I say give it a useful second life!

Thursday, December 26, 2013

"Flow Zone" Block of the Month: Finished Quilt Top

Today I finished putting together the quilt top for the "Flow Zone" Block of the Month. Now, I'm just waiting on my backing fabric so I can begin quilting!

Once I had all the blocks organized in a way that I loved, I decided to use the neutral color fabric (Kona Bone) for a sashing between the blocks. I used 2 inch strips between the blocks and 3 1/2 inch strips on the outer border. Now, you don't even have to do this part if you don't like it. It's your quilt so you can do whatever is appealing to you!
Since this is the first quilt for a couple of people participating, I recommend signing up on Craftsy and enrolling in the Free Block of the Month from 2012 by Amy Gibson. Around lesson 13, she walks you through how to put the blocks together, make the quilt sandwich and tips for quilting! You can start and stop the video as much as you want. You might even get the urge to make some of the blocks for a larger quilt top.

OR email me and I'll be happy to help with any questions!

Feel free to post photos on the progress of your quilt in the Flickr groupAt the end of January, I would like to have a party for all the people that participated. I'll touch base with everyone in the near future with more details.

Until then, I hope everyone is enjoying the break! Happy Holidays! :)


Friday, December 13, 2013

Fraction Mug Rug

Do you remember that interactive fraction strip quilt I created this year? Well, I've been dying to make one on a smaller scale to try out some different color options before I make another large quilt. When the Austin Modern Quilt Guild had a white elephant mug rug exchange I thought it was the perfect opportunity to experiment since I truly believe mathematics is beautiful! There will be many more of these fraction mug rugs in the near future. So, I'll just leave you with a few photos of how it turned out.

Front
Back - I love how the patterns emerge!

I found a mug at Crate & Barrel that matched nicely.

It's free-motion quilted with gray and teal on a black backing fabric.

:-) I'm told that it went to a very mathematical family. 
I hope they do some problem solving over morning coffee! ;-)


Sunday, December 8, 2013

A Blend of the Old and the New

At certain times in my life I've used the saying, "Out with the old and in with the new" to express the changes in life that deal with replacing old things or old people with new things or new people. On this last Thanksgiving trip home, I came to realize that this saying just isn't working for me anymore. I'm beginning to think that the personal changes in my life right now are a beautiful blend of old things and old people with new things and new people!

This is certainly true of many items that I've sewn in the past few years. For example, this apron is one of those old things that I look at and say, "wow, I think I could do that better," but why replace it? I mean, seriously...
Look at my sweet Polish grandmother, completely cheesin' in her "cheesy" colored apron! Would I make this color apron again, probably not, but does it even matter when I see that smile? Absolutely not.
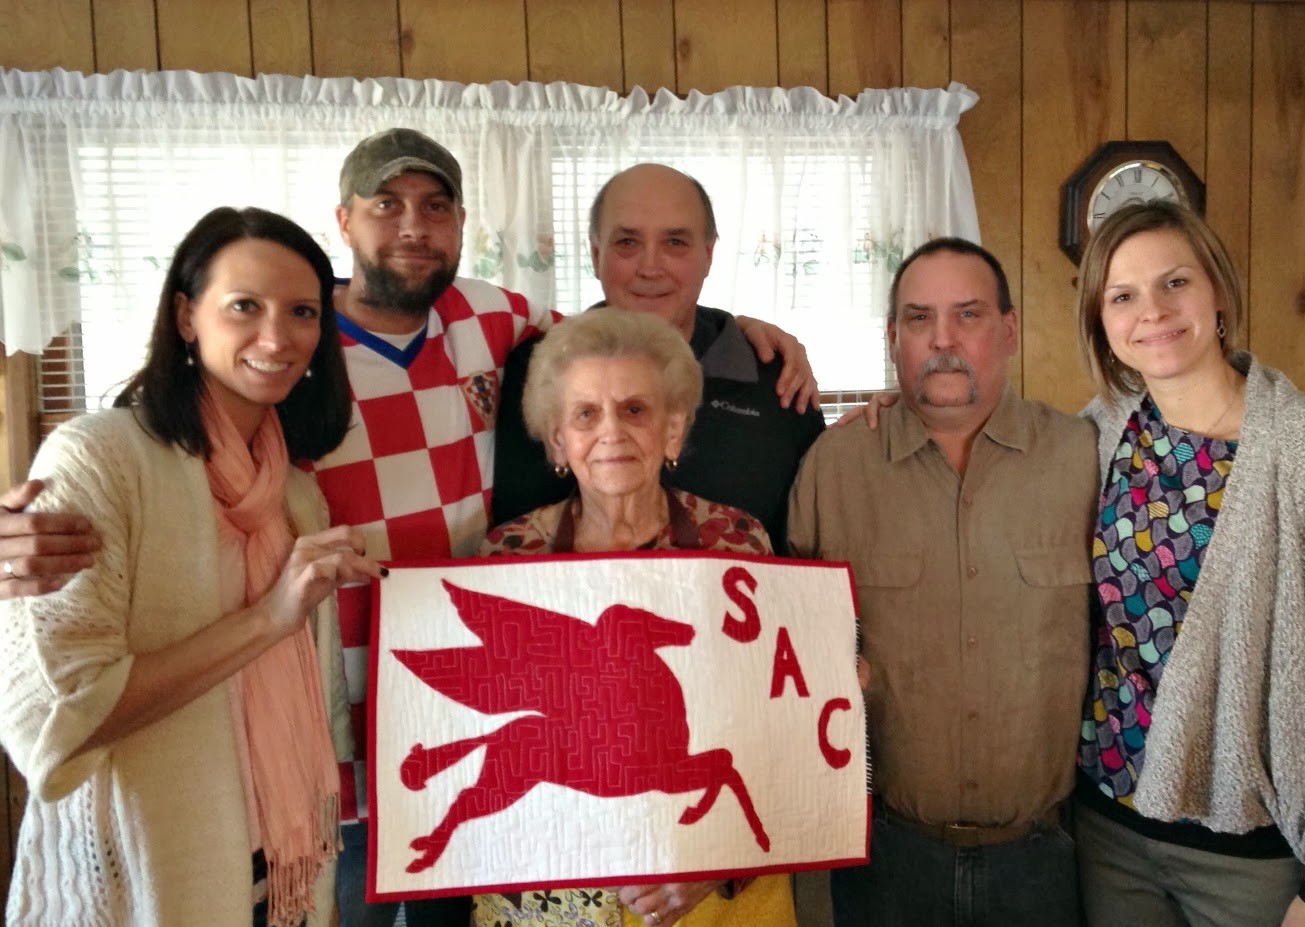
Here's a family photo (cousin, grandmother, 2 uncles and brother) with a portion of the Chinderle Family. That pegasus mini quilt was quilted for my brother (he's the one with the hat on in the back) and it has my father's initials. Don't get me wrong, this pegasus quilt does not replace my father, but it is something new I can create to basically say what this sign says on his grave...
My Uncle Brian hung that sign. Uncle B is the next on the list to receive a pegasus. In fact, he even asked me about how he could get one...little did he know I already have the fabric cut for it! Ha! I love when things work out like that.
I also spotted my first 'Bettina DANGER' label! Totally forgot about this until I saw the apron. 
Not sure what I was thinking before, but I'm so glad I invested in new labels shortly after that! (I ordered them on Etsy from Worldwide Label...not sure if there is a local place that does this, but I won't need labels for 10 years because I keep discovering more layers of labels in the little box they came in.)

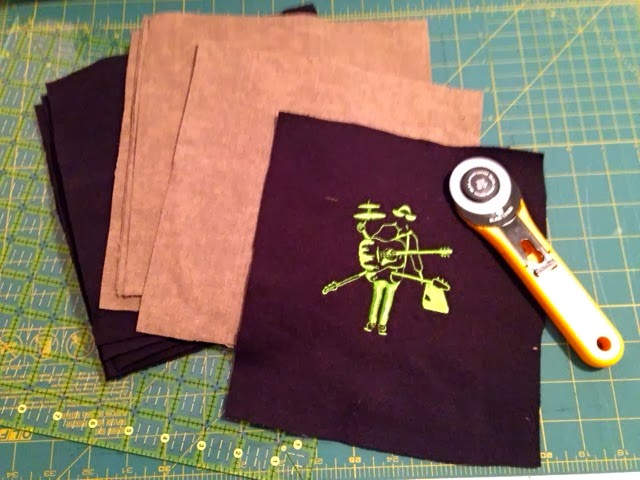
These last two photos crack me up. On the left, these were items that I brought home for gifts in 2011 when I first began sewing-before I had ever tried to sew a quilt or had this blog. The items on the right are creations I delivered home this last week. One thing is for certain, I've been introduced to some beautiful fabrics since 2011! I guess these two photos also show where I have arrived in my learning, making meaning from old projects and blending that learning into new projects.

With an abundance of inspiration in this world, I'm stoked to imagine what the next 5 years will bring to me as the last few years of sewing have brought an incredible amount of happiness to my life. As time is driving by, I'm going to appreciate every moment to learn from the old to create the new that will blend with the old...or something like that.


Saturday, November 30, 2013

"Flow Zone" Block of the Month: December

I hope everyone is having a wonderful Thanksgiving week! The final block chosen for December by Laura is called the...

*Lady of the Lake 2*

This block tutorial is one of Macia Hohn's Blocks from the Quilter's Cache.
Click here for the tutorial.

My version is less than perfect, but hey it works for me! :-)
I'd love to see your version in the Flickr group! Thanks to everyone who has participated all year. It really has been a special way to connect with co-workers and friends from the school district!

Next post, I'll give some support for finishing this quilt as best as I know how. You might have a great resource...let me know in the comments!


Wednesday, October 30, 2013

"Flow Zone" Block of the Month: November

Hey friends! :) How are you? I hope everything is beautiful in your world today. I chose the block this month and I thought we could try a...
*Wonky Log Cabin*

I just made mine up as I went along. I cut out a square for the middle and worked my way around the block cutting some strips wide and some skinny at slightly different angles until the area looked big enough. Actually, I used up a lot of my scraps from previous blocks. Then, I trimmed it to a 12 1/2" unfinished block.

Now, those directions are probably not very helpful so here are some wonderful directions from Quilt Dad. I can't wait to see your interpretation in the Flickr group!

Here's my finished block:
One more to go! I'm thinking that the December block will be posted next week. Next month is Laura's choice.

Monday, September 30, 2013

"Flow Zone" Block of the Month: October

Hi friends! I almost wrote that I can't believe it's the last day of September but my schedule has been so full of home, work and family business that it really actually does feel like it should be October tomorrow! Last week, our Superintendent encouraged us to embrace "flow" and strike a balance between our health, work and personal lives. So, in honor of the "flow zone" block of the month, I hope you will take your mind off of any stress and enjoy sewing this block! Thank you, Karen, for picking a beautiful block for the month of October! It's called the...

*Starflower*

Click here for the tutorial. On a side note, I didn't have the link for the tutorial when I made my block, so I challenge you to use what you learned from the August block to make it without the directions!

Here is my version:
So lovely! Don't forget to post your blocks in the Flickr group!
Click here for a link back to the other months.


Saturday, September 7, 2013

Rhombi in the Sky Quilt

Remember the equilateral triangle quilt progress I posted about last month? Well, although this quilt has been finished for a few weeks, I did not want to post any other photos until it was given to its owner which was Henry's dad, Henry! I'm pretty sure he liked it! I decided to name it Rhombi in the Sky. In my opinion, there are two fronts to the quilt...it just depends on what you are in the mood to look at!
How many rhombi do you see? How did you see them? A little subitizing (the ability to see a group of objects without counting) practice for you! Here we have 3 large and 6 small rhombi. I placed each rhombus on my design wall to match one of my sketches and voila! Rhombi in the sky was born. 
This is the second front of the quilt and it has 12 rows of equilateral triangles with 17 triangles in each row. Can you mentally do the math to find out how many triangles are on this quilt top? Try it now and then see if you did it similar to me. I thought of 12 x 12 and that is 144, and 12 x 5 = 60 (that 5 was left from the 17) So, 144 and 60 is 204 triangles! The finished dimensions were about 54" x 78". I'm estimating because I don't remember and the quilt is gone. If each side of the triangles are 6 1/2 inches, does that seem reasonable? (Last math question, I promise.)
Close up of the quilting. I tried my best to make some sharp angles but they ended up looking like STARS! I think it matched quite well with the rhombus side of the quilt.
Besides my Bettina DANGER tag, I don't have any custom quilt labels but I do like to quilt a few words and numbers. I smile every single time I hear those words above.

Thank you for reading!
Peace, Love and Happiness to YOU!


stitch by stitch

Sunday, September 1, 2013

"Flow Zone" Block of the Month: September

Blink! September has arrived. I hope everyone enjoyed the August block: The Zigzag! This month is Jeananne's choice...

*Castle in the Air*

Here is the link from The Quilter's Cache/Marcia Hohn.

Word of advice: Don't forget to look at Page 3 for the cutting list! I didn't realize this page was included  at the end. Livin' and learnin' over here!

Regardless... I do love how my block came together.
Can't wait to see your block in the Flickr Group!

Next up...It's Karen's choice for October! :) Only 3 more to go!

Wednesday, August 14, 2013

WIP - Teacher Leader Vision Quilt

Yep...still geeking out triangles! This is still very much a work in progress, but here is the beginning of our Elementary Math Teacher Leader Flag!
All of the math team selected a shape that represents them as a Math Teacher Leader. The three sections represent our district vision for all students to Make Sense of Math, Do the Math and Use the Math.

Next step, zig zag stitch around all of the shapes. More to come!


Tuesday, August 13, 2013

New Fabric from the Austin Shop Hop!

The Austin Fabric Shop Hop this past weekend was phenomenal! There were 6 stores participating (2 are usually exclusively online) and they all stock amazing fabric. Seriously...eye candy all day long! Click on the link above to see all of the stores that you can support if you need fabric!
Some of the items I bought are for my living room like the gorgeousness to the far left and the geometric print in the center. I'm itching to spice up that room with a floor pillow and/or cushion. The light blue, purple and orange fabric toward the front will be a perfect background for the future math teacher leader quilt flag. Annie Kitty is sitting to the right of some fabric that will become bags! And of course, do you spy the hexagon earrings? Math jewelry...my favorite! They will go perfect with my hexagon slacks I snagged up during tax free weekend.
I already made my mama an iPhone sleeve from some fabric she picked out. *Feeling blessed* Birthday month is turning out to be awesome! 9 more days of my twenties! 

Wednesday, August 7, 2013

WIP-Tumbling Blocks

In May, I started messing around with some three-dimensional designs. I found this video explaining tumbling blocks by Marci Baker. Although there are some excellent tips for a beginner like me, there aren't too many measurements to follow (and I don't have her book), so I guesstimated my best estimates and tried something out. Last week, I realized that The Craftsy Block of the Month for July by Laura Nownes discusses 60 degree triangles and tumbling blocks! After watching it, I couldn't help but wonder why this wasn't the May or June BOM...you know...before I sliced up some of my fabric! ;-)
I've taken the top right design and made it into a wall hanging. The quilting is done and I'm working on binding that today.
Contemplating a larger quilt...
...and trying to decide on what that will end up looking like! Any ideas out there?
Have you ever used isometric dot paper? Perfect for sketching out three-dimensional tumbling block ideas! 

In other news, I've finished the Equilateral Triangle Quilt I posted about last week and photos will be up on my blog soon! 

Have a beautiful day! :)


Thursday, August 1, 2013

"Flow Zone" Block of the Month: August

This is my favorite month of the year! BIRTHDAY MONTH!!! What a coincidence that it is my turn to select a block. I went back and forth on a couple of different things but I chose the...

*Zigzag Triangle Block*

This block is based off of this tutorial by Elizabeth Hartman (love her!) for the Sew Mama Sew Blog (love this blog!). I followed the instructions, but in order to stay within our 12 1/2 inch finished block, there are 2 cutting adjustments that you want to make: (don't worry...I did the math for you even though I know you can figure it out!)

1. Cut the squares (16 squares total) so they are 4" x 4" instead of 5" x 5".

2. Once you make your triangle blocks, trim each one to a perfect 3 1/2" by 3 1/2" block.

These few modifications with give you a perfect 12 1/2" finished block! Please comment below if you have a question or hunt me down and I'll be happy to help!

Here is my finished block. I hope to see everyone's block in the Flickr group!


Tuesday, July 30, 2013

Equilateral Triangle Quilt Progress

Summer break has gotten the best of me! Sleeping in too late and staying up too late with no schedule in between. This is my last week of that before I head back to work so I've decided that I need to get some sewing projects finished!

I'll be thrilled if I can complete this equilateral triangle quilt. I've been fascinated with triangles lately and after creating this mini quilt, I really wanted to do another project with this figure.
After many different arrangements on my design wall, I decided on 3 fabrics for the triangles to face up and 3 fabrics for the triangles to face down. This photo is close to the final layout. In the last few rows I changed some triangles around.
Since two equilateral triangles create a rhombus...I wanted to use that figure on the back. (This quilt is for a friend, so I have more reasoning to this design that I'll share later!) The rest of the background is blue. There was probably an easier way to piece this together, but I didn't know what that was! Better pictures of the quilt back to come.
Thank you, Annie Kitty, for lounging in the sun and not on the quilt sandwich while I was pinning.
Now I'm trying to decide on quilting. I'm thinking I want to do a free-motion design vs. straight lines. I sketched this idea out, but I'm thinking that the actual quilting will not be quite this dense. Any suggestions out there?

Hopefully I can make my mind up and get this baby finished! :)

Linking up at Freshly Pieced for WIP Wednesday.

Monday, July 22, 2013

One Year Blog Anniversary Reflections

July 6th marked my one year blog anniversary! Thankfully, I've been off work this month, so I've enjoyed much needed leisure time to reflect and celebrate the sewing I've completed this year.

As I reviewed my blog, a few entries brought smiles to my heart (I linked up past blog posts if you want to check out photos)...here are the numbers:
  • 44 blog posts (22 the first 6 months, 22 in the second 6 months) 22 is my magic number so it was only appropriate to post this reflection on 2:22 on July 22nd, 1 month before my decade birthday on August 22nd.  
So wow~I sewed, quilted, created, and did a ton of math! Through these projects I learned way more about myself than I ever expected. In an interesting way, what I choose to create offers a glimpse into my life and passions, as well as where I stand in my personal learning journey. Yes, there are plenty of things I wrote about that I would do differently and I hope that will be evident in my future posts. One thing is crystal clear to me: Every single project I do, I learn something that I didn't expect to learn. Every single time.

So all in all I'm reminded to...

Be positive. "Watch your thoughts; they become words. Watch your words; they become actions. Watch your actions; they become habit. Watch your habits; they become character. Watch your character; it becomes your destiny." -Lao Tzu

and most importantly...

Keep on keepin' on -Henry + The Invisibles


Sunday, June 30, 2013

"Flow Zone" Block of the Month: July

Carol's magical choice for July's Block of the Month is...

*Card Tricks*


Don't forget to post your quilt blocks in the Flickr group!
Also, here is a link to the previous months.

Here is my version. Can't wait to see everyone else's "Card Tricks"!

Sunday, June 23, 2013

Equilateral Triangle Mini Quilt, Kitchen Curtain and a Skirt!

A few months or so ago, I bought a fat quarter bundle at Remnants: Fiber culture for no reason other than it looked pretty. About 7 months ago, I moved into a new house. In turn, my walls are still incredibly naked. So, that fat quarter bundle paired with my bare house is an excellent recipe for creation! Please check out my equilateral triangle mini quilt, kitchen curtain and skirt! 
Who doesn't love triangles? I realize that triangles come in all different shapes and sizes (and students should learn about more than just the regular triangle), but there is still something about the equilateral triangle that I adore. 3 equal sides, 3 congruent 60 degree angles...wait...oh yes...the 60 degree angles is what I love! They were interesting to cut out and fairly simple to piece together! This blog, On the Windy Side, originally inspired me to go for it. I have plans to make a larger one in the near future for a gift.

Perfect for the kitchen. I can glance over at the magic triangles while I am cooking. I still may bring it down a little lower on that wall.

And along with a naked house comes naked windows! Slowly but surely, I'm making them gorgeous. I used some of the fabric for a basic curtain. It was so simple. Rectangles, ironing, and straight seams...loveliness!

Here is another view. I can adjust the curtain rod as different light comes in throughout the day. The yellows (or yellers as I like to jokingly say) in the fabrics just remind me of the kitchen! 

Lastly, using some elastic thread and squares, I pieced together this little skirt. I've worn it a few times and I love it!

Not the best photo...but you get an idea for how it looks on.

Of course, I have scraps left over, so some scrappy potholders are already in the works! :-)

Thanks for reading and have a beautiful day! 


Tuesday, June 11, 2013

My Interactive Fraction Strip Quilt!

Have you ever used fraction tiles before? You might recognize them if you saw a photo so here is a link. Fraction tiles can be a very useful model in understanding fractions, however, math educators...be careful! Sometimes these tiles can hide the true understanding our students have about fractions. Who needs fraction tiles when you can have this gorgeous interactive fraction quilt that starts at the top (white) with one whole, and continues with (red) halves, (pink) thirds, (black) fourths, (green) fifths, (purple) sixths, (yellow) sevenths, (teal) eighths, (orange) ninths, (gray) tenths, light pink (elevenths), and dark purple (twelfths)?!

The free-motion quilting on the back highlights the unit fractions quite nicely. The greater the denominator the smaller the piece is!